Why it matters
Two strategies, very different trade-offs
Every SPR experiment starts with the same decision: how do you get your ligand onto the sensor surface? The answer determines your surface density, ligand orientation, regeneration strategy, and the purity requirements for your sample.
There are two fundamentally different approaches — direct covalent immobilization (you chemically couple the protein to the surface) and capture-based immobilization (the sensor surface holds a capture agent that grabs your tagged protein). Each has clear advantages and specific limitations.
STRATEGY 01
Direct immobilization
Covalent · EDC/NHS amine coupling
Sensors
Kits
STRATEGY 02
Capture-based immobilization
Affinity · Tag or antibody interaction
Sensors
Kits
Side-by-side comparison
Capture options at a glance
When to use each strategy
Direct immobilization
Choose covalent coupling when…
- Your protein has no tag and can't be modified
- You need a permanent, ultra-stable surface for long multi-day studies
- Sample purity is high (>80%) and reproducible
- You want to maximize surface density for low-MW analytes
Capture-based
Choose capture when…
- Your protein carries a tag (His, biotin, Strep-tag, Fc region…)
- You want consistent, orientated surface loading every run
- Your sample is complex or partially purified
- You need to regenerate the surface and reload fresh ligand (NTA, anti-His, Protein A/G)
Before you immobilize
How much ligand should I immobilize — and which partner goes on the surface?
Which partner goes on the surface? Immobilize the partner that best tolerates coupling and regeneration. If both work, put the larger one in solution: the SPR signal scales with the mass that binds, so a bigger analyte gives a bigger signal. Small molecules are the classic exception: they go in solution over a high-density protein surface, since they give only a small response.
- Kinetics (kon, koff): use a low ligand density. A dense surface makes the association phase linear (mass-transport limited) and lets released analyte rebind during dissociation, which distorts the rate constants.
- Small analytes or simple yes/no binding: use a higher density to maximize the signal.
Rmax = (MWanalyte / MWligand) × immobilized ligand level (RU) × stoichiometry
Worked example: a 150 kDa ligand immobilized at 1,000 RU and a 50 kDa analyte binding 1:1 give Rmax = (50 / 150) × 1,000 × 1 ≈ 333 RU. Stoichiometry is the number of analyte molecules each ligand can bind — an antibody has two binding sites, so for an antibody ligand it is 2. This is the theoretical maximum: the Rmax from your fit is usually lower, because not every immobilized ligand stays active — so comparing the two is a quick check of surface quality.
More on reading Rmax, density and kinetics: TN-03: The SPR sensorgram explained · Static vs. kinetic SPR · Blog: SPR sensorgram explained
Direct immobilization, step by step
How EDC/NHS amine coupling works
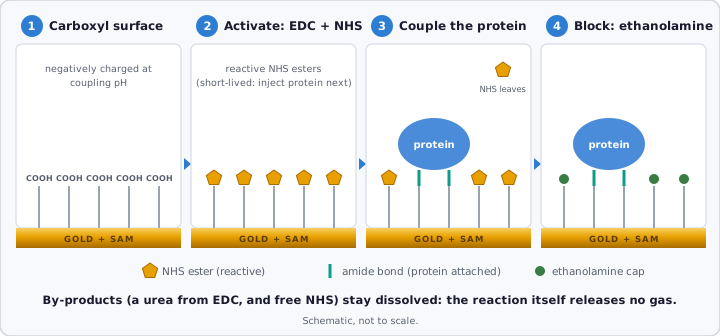
EDC and NHS turn the carboxyl groups of the sensor surface into reactive NHS esters. Your protein, in a low-salt buffer at a pH just below its pI, carries a net positive charge, so it is drawn to the still-negative surface and concentrates there; its lysine amines then react with the esters to form stable amide bonds. Ethanolamine blocks the esters that are left. Because the esters and EDC break down in water within minutes to hours, mix EDC and NHS just before injecting and add the protein straight after activation.
Troubleshooting coupling and capture
Stuck mid-experiment? The most common problems — and what to check first.
Why do I get bubbles during EDC/NHS activation?
Not from the chemistry: the reaction releases no gas, and its by-products stay dissolved. The bubbles are air, either coming out of cold or un-degassed solutions as they warm on the sensor, or drawn in during injection. They matter most at activation: a bubble sitting on the surface leaves that spot unactivated, so no ligand couples there.
- Check every channel for air bubbles before activation, immobilization and blocking — a bubble at any of these steps compromises the surface.
- Inject at least 200 µL per channel; 250 µL is recommended to avoid trapping air.
- To clear a bubble, inject at a higher flow rate (~200 µL/s) or use pulsed injections.
- Degas buffers and let solutions reach room temperature before injecting — cold solutions release dissolved gas as they warm.
- A stubborn bubble before the surface is activated: inject 200 µL of 0.5% SDS or 1% Tween 20, then rinse with 10× the volume of water.
Why is my immobilization level low?
- Coupling buffer pH: the protein must carry a net positive charge to concentrate on the carboxyl surface, so use a pH below its pI. Protocol #1 uses 10 mM sodium acetate, pH 5.0; the Immobilization Scouting Kit finds the best pH for your protein.
- No amine-containing buffers (Tris, glycine) in the protein solution — they react with the activated surface and compete with your protein.
- Fresh EDC/NHS: aliquot and freeze the stocks, then thaw and mix immediately before injection — never pre-mix and store.
My protein coupled, but it barely binds its partner — why?
- Amine coupling attaches the protein through its lysines at random. If lysines sit in or near the binding site, part of the surface is inactive.
- Switch to a capture strategy (His-tag, biotin, Fc) for oriented presentation — see the table above.
Why does my baseline drift after His-tag capture?
- His-tag binding to Ni-NTA is moderate, so captured ligand can slowly dissociate and the baseline drifts down. Anti-His capture holds more tightly.
- Any surface needs time to settle: hold running buffer until the baseline varies less than 10 RU over 5 minutes before you start.
- Baseline creeping up or drifting down between cycles? Check your regeneration: SPR regeneration guide →
How do I reduce non-specific binding?
- Run a reference channel (same surface, no ligand) and subtract it.
- Use AffiCoat, a zwitterionic surface that resists non-specific adsorption — suited to serum and cell lysates. How AffiCoat works →
- Tween 20 in the running buffer (typically 0.005–0.05%) also helps.
Go deeper
Ready to choose your sensor?
Use the step-by-step selector on the Sensor Guide to get a recommendation based on your specific ligand tag and experiment type — then go straight to the catalog to build your order.